
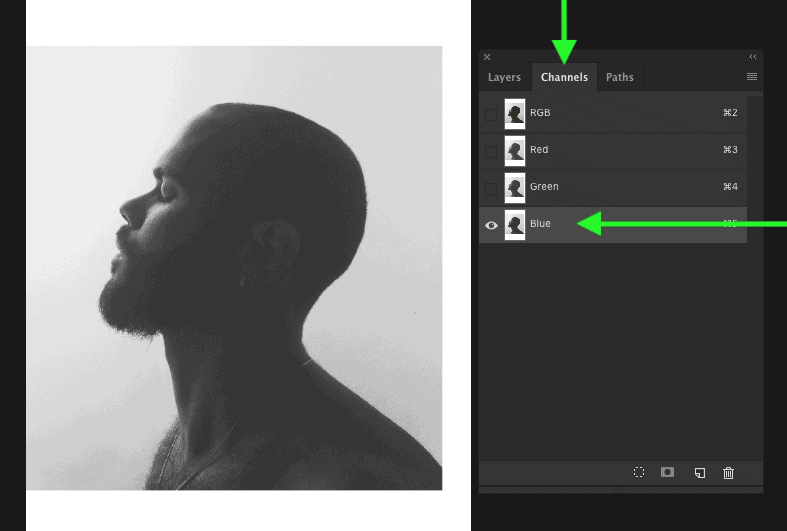
Step 1: Cut Out Your Subject

- Find the channel with the most contrast then duplicate that channel.
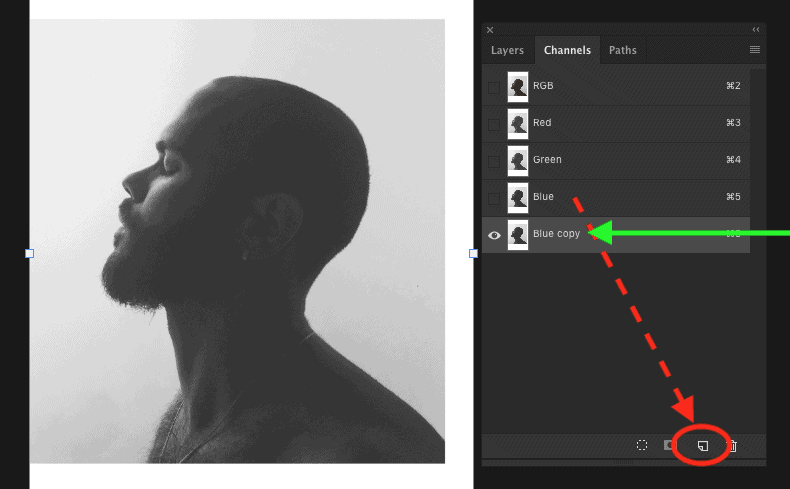
- Select the duplicated channel and press Mac: CMD + L or PC: CNTRL + L to bring up your levels adjustment. Add contrast.

- Once your subject is mostly black, and the background is mostly white, hold CMD or CNTRL and click on your channel layer thumbnail to make a selection. With that active selection, go back to your layers tab and select the person layer. Hold ALT or OPT and add your selection to a layer mask.

- Fill in any missing areas by painting black or white onto your layer mask
Step 2: Bring In Other Images
Now our subject is cut out and it’s time to bring in the other images! Just drag and drop your images into your current project window for ease.
- Once the images are in the window, position them into the general location you want them to go.
- Next add a layer mask to the images so they are restricted to outline of our subject. Hold CMD or CNTRL and click on your subjects layer mask to make that selection. With that active selection, select your other layers and add a layer mask.

- Click the chain icon between the layers and layer mask to move the layer independently from the mask, that way you can rescale without moving anything out of place!

In my final image, I also cut out the sky from my tree image for added effect. I cut out the sky using channels in the same order as step 1.
Step 3: Duplicate And Lighten!
So now the images are in place but now we are wanting to actually make this double exposure effect come to life.
- Select your subject and duplicate that layer then drag the newly duplicated layer to the top of your layer stack. Ensure your layer is not a smart object and then desaturate this layer. Do this by going IMAGE > ADJUSTMENTS > DESATURATE .
- Change your layer blending mode from Normal to Lighten to create the ghostly double exposure look.
Step 4: Refine Interior Images and Layer Masks
You will likely have some hard edges still visible from step 2. Use this step to mask out any hard edges and make things blend smoothly. Make sure you paint with a 0% hardness brush for best results!
If you are not a fan of how much is shown of your person/subject, just mask out parts of your Lighten layer(Step 3)with a low opacity brush.
Extra Tip: To make your images blend even further, try masking out certain areas with a low opacity brush to make the images fade into view even more!
Step 5: Add A Colour Fill Background Layer
A white background is a little too basic you say? Fear not, we have a step for that. Click on your Adjustment Layer menu at the bottom of the layers window and go up to Solid Colour.
- With the colour picker open, sample a background colour already present in your image and select it.–
- Click on the Colour Fill Layer Mask and add a foreground to transparent radial gradient using your Gradient tool.

- Adjust opacity or fill of this colour fill layer as you see fit.

Step 6: Final Touches
At this stage, the effect is complete! Now would be the time to add any specific colour adjustments to take your double exposure to the next level. Make these adjustments using any of the adjustment layers found in your Adjustments Window. Heres how my final image turned out:

0 Comments